
 By
By 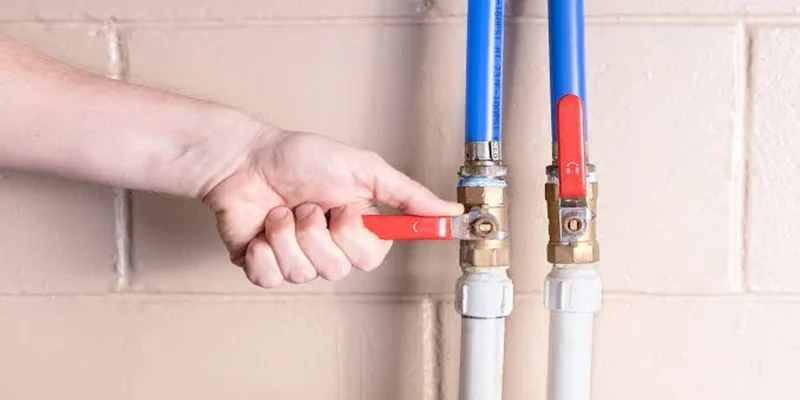
Every household has a fire drill in its head. Most people know which door to use and where to meet outside. Almost nobody has a water drill. Yet a burst supply line can put hundreds of gallons into a house in an hour, and the person standing in the kitchen with water at their ankles is rarely in the best state to start a search for the main valve.
The fix is to practice. This article lays out a short household drill, built the way a fire drill is, with a goal, roles, a timeline, and a debrief. Run it once on a calm weekend and you will know exactly what to do when it is not calm. It is general information, and your home’s setup may differ.
The Goal of the Drill
The goal is simple: be able to stop the water to your whole house in under two minutes, without a search, a tool hunt, or an argument. Everything else in this drill supports that one number.
Step One: Find the Main Shutoff
Start with a walk. The main shutoff valve is where the water line enters the house, and its location depends on your climate and construction. Common spots include a basement wall near the front of the house, a utility room, a crawl space, a garage, or a closet near the water heater. In warm regions it is sometimes outside, in a ground-level box near the meter.
When you find it, look at the type. A round wheel handle, called a gate valve, closes by turning clockwise many times, and it can seize or break after years of disuse. A lever handle, called a ball valve, closes with a quarter turn and is much more dependable. If you have a gate valve, mention it to a plumber, since replacing it with a ball valve is a small project that pays off in a real emergency.
Tag the valve with a bright label or a tag that says exactly what it does. Anyone in the house, including a guest or a babysitter, should be able to read it in a panic.
Step Two: Test It Gently
This is the step people skip, and it is the one that matters most. A valve that has not moved in a decade may not move when you need it. Turn it slowly, a little at a time, to confirm it operates. If it is stiff, do not force it, because a broken valve stem can create the emergency you are trying to prevent. Note the stiffness and ask a professional to look at it.
If you do close it fully as a test, open a faucet at the lowest point of the house to confirm the flow has stopped, then reopen the valve slowly and let the pipes refill. Opening it back up too quickly can send a pressure jolt through the system.
Step Three: Map the Local Shutoffs
The main valve is the big hammer, but most plumbing problems are local. Under every sink, behind every toilet, at the washing machine, and at the water heater there are smaller valves that isolate a single fixture. Knowing where they are can save you from shutting off the whole house for a dripping faucet.
Walk through and touch each one. Look for corrosion, drips, or green crust, which suggest a valve that is wearing out. Valves that are stuck open at the wall or leaking around the stem are worth flagging for repair. While you are at the water heater, find the cold water inlet valve, and note whether the heater has a pressure relief valve and a discharge pipe, which are important safety features that should never be capped or blocked.
Step Four: Know Where the Electricity Meets the Water
Water and electricity share a house, and an emergency can involve both. If water is pouring from a ceiling light fixture or reaching outlets, the safest move is to shut off power to that area at the breaker panel, but only if you can reach it without standing in water. If you cannot do so safely, stay clear and call for emergency help.
Likewise, if a water heater is leaking, shut off its power or gas supply as well as its water, following the manufacturer’s directions. Learning where the breaker for the water heater is, and labeling it, adds seconds to your response in the right direction.
Step Five: Assign Roles
A good drill gives everyone a job. In a household with more than one adult, decide who closes the main valve, who calls for help, and who moves valuables and electronics out of harm’s way. If children are old enough, teach them where the main valve is and what it does, even if an adult will normally operate it. Teenagers in particular can be a real asset in an emergency.
Write the plan on a card and put it somewhere visible, such as inside a utility cabinet or on the refrigerator. Include your plumber’s phone number and your insurer’s claim line.
Step Six: Run the Clock
Now the actual drill. Pick a moment when everyone is home, and without warning anyone of the location, say that a pipe has burst in the kitchen. Start a timer. Someone has to walk to the main valve, find it, and operate it, and the clock stops when the water is off, or in a practice run, when the valve is touched and confirmed.
Do not be discouraged if the first attempt takes five minutes. That is exactly the information you wanted. Debrief afterward. What slowed you down? Was the valve blocked by storage? Was the label too small? Did anyone not know where to go? Fix those things, and run it again in six months.
Step Seven: Prepare the Supplies
A small kit near the main valve can shorten the response. Useful items include a flashlight with working batteries, a valve key or wrench if your valve requires one, towels, a bucket, a wet and dry vacuum if you own one, and a list of emergency contacts. Keep the area around the valve clear, because stacks of boxes tend to migrate in front of it over the years.
Step Eight: Learn the Slow Leaks
The drill covers sudden bursts, but the sneakier damage comes from slow leaks. A toilet that runs, a drip behind a cabinet, or a slow weep from a supply line may not be dramatic, but it adds up over months, wasting water and feeding mold and rot.
One of the simplest tests uses your water meter. Turn off every fixture and appliance that uses water, then read the meter and check it again after an hour or two. If the numbers moved, water is going somewhere. The U.S. Environmental Protection Agency’s WaterSense program offers practical tips in its Fix a Leak Week resources, including how to check toilets and faucets and how much a small leak can waste over time.
Step Nine: Prepare for Cold Weather and Travel
Two situations deserve their own mini drills. Before a hard freeze, know how to protect exposed pipes, disconnect outdoor hoses, and keep the heat on in the house, since frozen pipes often burst when they thaw and the water starts to flow. Before an extended trip, consider shutting off the main valve, or at least the supply to the washing machine, since a failed hose can run for days with nobody home. Some homeowners add automatic leak sensors or a smart shutoff device that closes the valve when it detects water in the wrong place.
Step Ten: Call the Right Person
Some problems are beyond a homeowner’s drill. If a valve will not close, a pipe has failed inside a wall, the water heater is leaking steadily, or you smell sewage or gas, call a professional right away. For gas smells in particular, leave the building and contact your gas utility or emergency services from outside.
If you are looking for local help, you could contact James Plumbing to ask about valve replacement, leak detection, or an inspection of your home’s shutoffs. Whoever you call, ask whether they offer emergency service, how they communicate pricing before starting work, and what warranty they provide on parts and labor. A plumber who takes a few minutes to explain what they found is usually the one worth keeping on speed dial.
The Debrief
A drill like this takes less than an hour, and it costs almost nothing. What it buys is the ability to react instead of scramble. The next time you hear a hiss in the wall or see a stain spreading on the ceiling, you will not be wondering where the valve is. You will already know, you will have practiced the walk, and you will be able to turn a potential disaster into a wet floor and a phone call. That is the whole point of the drill, and it is the cheapest insurance a household can buy.






Comments